

T48S
The SIP-T48S IP Phone is a dynamic business communications solution for executives and professionals. This phone offers a large touch screen that makes switching between pages and applications swift, easy and convenient. The SIP-T48S is also with Yealink’s Optima HD Voice technology and wideband codec of Opus for unparalleled audio clarity. Phone users will think they are sitting in the same room with one another. The phone uses Gigabit Ethernet technology for rapid call handling.
- 800 x 480 touch screen display
- 16 line keys
- HD Speaker, HD Handset
- 3-way Conferencing
- Gigabit port, integrated PoE
- Integrated Bluetooth
- Supports Wi-Fi adapter
T48S Training Video
Phone Installation
If your phone is already installed proceed to the next section of this manual.
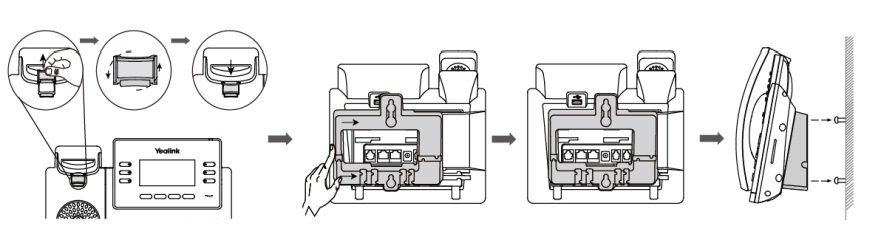
Mounting your phone
- Attach the stand.
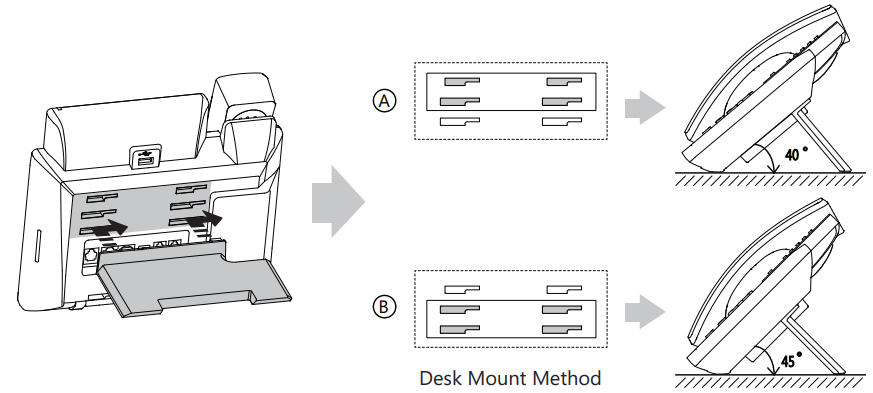
- Or attach the optional wall mount bracket.
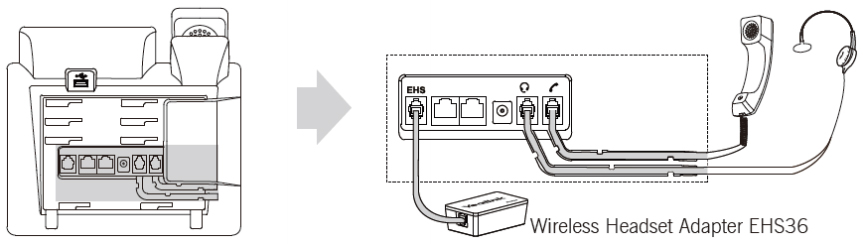
Connecting Cables
- Connect the handset and optional headset.
- Connect the network cable into the Internet port on the phone. If your network has POE (Power Over Ethernet), your phone should turn on. If your phone is going to be connected to the network wirelessly, check the Wi-Fi Connection instructions below.
- Connect the PC into the PC port on the phone.
- If the phone is still off, connect the Power Adapter into the DC port on the phone. If your phone is already on and is getting power from the network cable, DO NOT connect the Power Adapter.
- Once your phone is powered on and connected to a working wired or wireless network, you should be able to start using it. Check out the Hardware Component Instructions below to get more familiar with your new phone.

Hardware Components
The main hardware components of the T48S IP phone are the touch screen and the keypad.
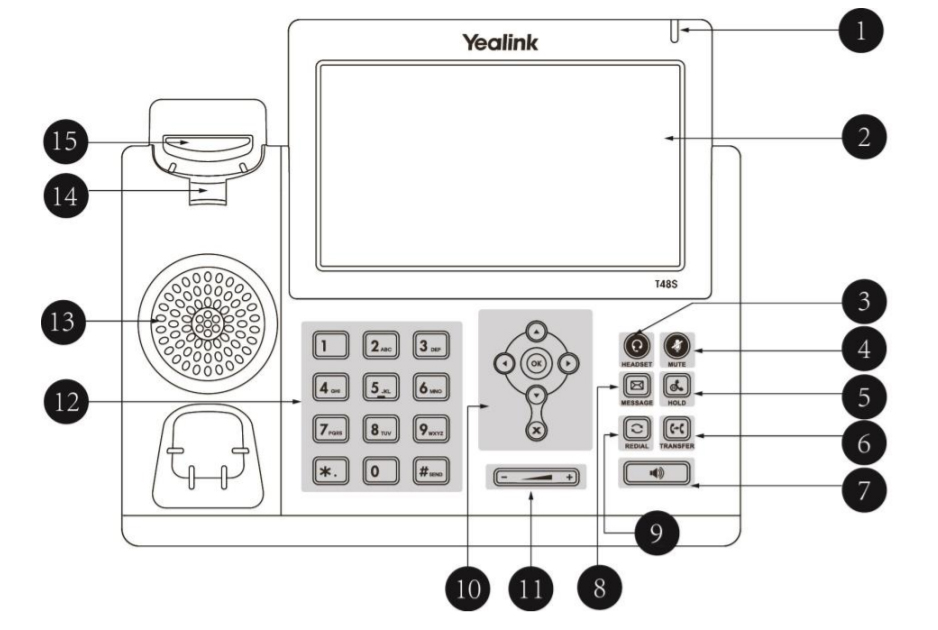
1. Indicator Light
Indicates call status, message status and phone’s system status.
• Receives an incoming call – Fast-flashing
• Receives a voice mail or text message – Slow-flashing
2. Touch Screen
The screen is touch-sensitive. Tap to select and highlight
screen items. It shows information about calls, messages, soft keys, time, date and other relevant data:
• Your extension
• Call information—caller ID, call duration
• Icons (for example, DND when it’s activated)
• Missed call text or second incoming caller information
• Time and date
3. Headset Key
Toggles and indicates the headset mode.
4. Mute Key
Toggles and indicates mute feature.
5. Hold Key
Places a call on hold or resumes a held call.
6. Transfer Key
Transfers a call to another party.
7. Speakerphone Key
Toggles and indicates the hands-free (speakerphone) mode. The key LED illuminates solid green when hands-free (speakerphone) mode is activated.
8. Message Key
Access your voicemail.
9. Redial Key
Redials a previously dialed number.
10. Navigation Buttons
 Scroll through the displayed information.
![]() Confirms actions or answers incoming calls.
Confirms actions or answers incoming calls.
![]() Cancels actions or rejects incoming calls.
Cancels actions or rejects incoming calls.
11. Volume Key
Adjusts the volume of the handset, headset, speaker, ringer or
media.
12. Keypad
Provides the digits, letters and special characters in
context-sensitive applications.
13. Speaker
Provides hands-free (speakerphone) audio output.
14. Hookswitch Tab
Secures the handset in the handset cradle when the phone is mounted vertically. If you need your phone mounted on the wall, remove the hookswitch tab, turn it upside down, and insert back until it clicks. That way the handset will be held by it when the phone is mounted vertically.
15. Hookswitch
Switches the phone “off-hook” and connects to the line when the handset is lifted. Switches the phone “on-hook” and disconnects from the line when the handset is put down.
Feature Status Icons
Icons appearing on the status bar are described in the following table:
Phone Customization
Time & Date
- Update the time and date by going to Menu > Basic Settings > Time & Date > General.
- Choose SNTP Settings and select your time zone in UTC format. Press Save.
- Go to Time & Date Format and choose the 12 hour or 24 hour format.
Display Settings
Change the display settings by going to Menu > Basic Settings > Display. In there, you can modify the settings for your Backlit level, Contrast, Wallpaper, and Screensaver.
Sound Settings
You can change the default ringtone and other sound settings by going to Menu > Basic Settings > Sound.
Distinctive Ringtones
You can set different ringtones to ring on your phone when certain numbers are calling. This feature is useful when, for example, you would like your internal calls to ring differently than the external calls.
Go to Directory > All Contacts. edit and existing contact or add a new one. Enter the contact’s name as well as their extension number, scroll down and choose a ringtone for this contact, then press save. You can add the rest of your internal extensions this way, so that they sound differently from your external calls.
Your phone PIN
Change your PIN by going to Menu > Basic Settings > Change PIN.
Phone Lock
You can lock your phone by going to Menu > Basic Settings > Phone Lock.
Bluetooth Headset
To use a bluetooth headset you will need a bluetooth headset and a usb bluetooth dongle.
Insert the usb bluetooth tongle into the usb port on the back of the phone. If the bluetooth was not enabled, a prompt interface will show on the screen. Press OK and enable the bluetooth function. To connect to your bluetooth headset, press Scan to scan for available bluetooth devices, select your headset and press Connect. To use your bluetooth headset, press the headset key on the phone and dial a number. You can now switch between your headset, handset, and a speakerphone by pressing the appropriate keys on the phone.
Change bluetooth settings by going to Menu > Basic Settings > Bluetooth.
Wi-Fi Connection
If your phone is going to be connected to the network wirelessly, connect the Wi-Fi Adapter into the USB port on the back of the phone. Press Yes to scan for available wireless networks. Connect to an available wireless network. You can also connect to a wireless network by going to Menu > Settings > Basic Settings > Wi-Fi. Turn the Wi-Fi on and connect to a wireless network.
Phone Status
Your phone’s IP address
Your phone’s IP address can be found by pressing the OK button while the phone is idle.
Your phone’s MAC address
Your phone’s MAC address can be found by either pressing the OK button while the phone is idle, or by looking at the back of your phone.
Moving to a different workspace
One of the best benefits of our cloud phone service is that you can use your desk phone anywhere you want. Just unplug the phone from power and network, bring it over to another location, whether it’s at an office across the hallway, your home, or even a in different state. Just plug in the power and network back and continue using your phone as if you haven’t moved anywhere.
Other Instructions
Calling, Transferring, Voicemail Instructions